I've created a new blog (http://getting-started-with-spring.blogspot.in/) where I'll be publishing details related to 'Getting started with Spring Framework' book.
Saturday, December 15, 2012

Wednesday, December 12, 2012
Detailed ToC of 'Getting started with Spring Framework'
Chapter 1 - Spring Framework basics
1-1 Introduction
1-2 Spring Framework modules
1-3 Why use Spring Framework?
Declarative transaction management
Security
JMX (Java Management Extensions)
JMS (Java Message Service)
Caching
1-4 DI and Spring IoC container
Dependency Injection (DI)
Identifying application objects and their dependencies
Creating POJO classes corresponding to identified application objects
Creating the configuration metadata
Creating an instance of Spring IoC container
Access application objects from the Spring IoC container
1-5 Programming to interfaces
Scenario: Dependent class contains reference to the concrete class of dependency
Scenario: Dependent class contains reference to the interface implemented by dependency
Spring’s support for programming to interfaces design approach
1-6 Different approaches to instantiating Spring beans
Instantiating beans via static factory methods
Instantiating beans via instance factory methods
1-7 Dependency injection techniques
Setter-based DI
Constructor-based DI
1-8 Bean scopes
Singleton
Prototype
Choosing the right scope for your beans
1-9 Frameworks built on top of Spring
1.10 Summary
Chapter 2 - Configuring beans
2-1 Introduction
2-2 Bean definition inheritance
MyBank App – Bean definition inheritance example
What gets inherited ?
2-3 Constructor argument matching
Passing simple values and bean references using element
Constructor argument matching based on type
Constructor argument matching based on name
2-4 Configuring different types of bean properties and constructor arguments
Built-in property editors in Spring
Specifying values for different collection types
Specifying values for arrays
Default collection implementation for , and elements
2-5 Built-in property editors
CustomCollectionEditor
CustomMapEditor
CustomDateEditor
2-6 Registering property editors with the Spring container
Creating a PropertyEditorRegistrar implementation
Configuring the CustomEditorConfigurer class
2-7 Concise bean definitions with p and c namespaces
p-namespace
c-namespace
2-8 Spring’s util schema
<list>
<map>
<set>
<properties>
<constant>
<property-path>
2-9 FactoryBean interface
MyBank App application – Storing events in the database
MyBank App – FactoryBean example
Accessing the FactoryBean instance
2-10 Summary
Chapter 3 - Dependency injection
3-1 Introduction
3-2 Inner beans
3-3 Explicitly controlling the bean initialization order with depends-on attribute
MyBank App – implied dependencies between beans
Implicit dependency problem
3-4 Singleton- and prototype-scoped bean’s dependencies
Singleton-scoped bean’s dependencies
Prototype-scoped bean’s dependencies
3-5 Obtaining new instances of prototype beans inside singleton beans
ApplicationContextAware interface
<lookup-method> element
<replaced-method> element
3-6 Autowiring dependencies
byType
constructor
byName
default / no
Making beans unavailable for autowiring
Autowiring limitations
3-7 Summary
Chapter 4 - Customizing beans and bean definitions
4-1 Introduction
4-2 Customizing bean’s initialization and destruction logic
Making Spring invoke cleanup method specified by the destory-method attribute
Cleanup methods and prototype-scoped beans
Specifying default bean initialization and destruction methods for all beans
InitializingBean and DisposableBean lifecycle interfaces
JSR 250’s @PostConstruct and @PreDestroy annotations
4-3 Interacting with newly created bean instances using BeanPostProcessor
BeanPostProcessor example – Validating bean instances
BeanPostProcessor example – Resolving bean dependencies
BeanPostProcessor behavior for FactoryBeans
RequiredAnnotationBeanPostProcessor
DestructionAwareBeanPostProcessor
4-4 Modifying bean definitions using BeanFactoryPostProcessor
BeanFactoryPostProcessor example
PropertySourcesPlaceholderConfigurer
PropertyOverrideConfigurer
4-5 Summary
Chapter 5- Annotation-driven development with Spring
5-1 Introduction
5-2 Identifying Spring components with @Component
5-3 @Autowired - autowiring dependencies by type
5-4 @Qualifier – autowiring dependencies by name
5-5 JSR 330’s @Inject and @Named annotations
5-6 JSR 250’s @Resource annotation
5-7 @Scope, @Lazy, @DependsOn and @Primary annotations
5-8 Simplifying component configuration using @Value annotation
5-9 Validating objects using Spring’s Validator interface
5-10 Specifying constraints using JSR 303 annotations
JSR 303 support in Spring
5-11 Programmatically configuring Spring beans using @Configuration and @Bean annotations
5-12 Summary
Chapter 6 - Database interaction using Spring
6-1 Introduction
6-2 MyBank App application’s requirements
6-3 Developing the MyBank App application using Spring’s JDBC module
Configuring a data source
Creating DAOs that use Spring’s JDBC module classes
6-4 Developing the MyBank App application using Hibernate
Configuring SessionFactory instance
Creating DAOs that use Hibernate API for database interaction
6-5 Transaction management using Spring
MyBank App’s transaction management requirements
Programmatic transaction management
Declarative transaction management
Spring’s support for JTA
6-6 Summary
Chapter 7 - Messaging, emailing, asynchronous method execution, and caching using Spring
7-1 Introduction
7-2 MyBank App application’s requirements
7-3 Sending JMS messages
Configuring ActiveMQ broker to run in embedded mode
Configuring a JMS ConnectionFactory
Sending JMS messages using JmsTemplate
Sending JMS messages within a transaction
Dynamic JMS destinations and JmsTemplate configuration
JmsTemplate and message conversion
7-4 Receiving JMS messages
Synchronously receiving JMS messages using JmsTemplate
Asynchronously receiving JMS messages using message listener containers
7-5 Sending emails
7-6 Task scheduling and asynchronous execution
TaskExecutor interface
TaskScheduler interface
@Async and @Scheduled annotations
7-7 Caching
Configuring a CacheManager
Caching annotations - @Cacheable, @CacheEvict and @CachePut
7-8 Running the MyBank App application
7-9 Summary
Chapter 8 - Aspect-oriented programming
8-1 Introduction
8-2 A simple AOP example
8-3 Spring AOP framework
Proxy creation
expose-proxy attribute
8-4 Pointcut expressions
@Pointcut annotation
execution and args pointcut designators
bean pointcut designator
Annotations-based pointcut designators
8-5 Advice types
Before advice
After returning advice
After throwing advice
After advice
Around advice
8-6 Spring AOP - XML schema-style
Configuring an AOP aspect
Configuring an advice
Associating a pointcut expression with an advice
8-7 Summary
Monday, December 10, 2012
Book 'Getting started with Spring Framework' is now available
'Getting started with Spring Framework' book that I started writing couple of months back with J Sharma is now available at amazon : http://amzn.to/VwbjdX
You can download the source code of the book from here: http://code.google.com/p/getting-started-with-spring-framework/downloads/list
You can post your questions and feedback here: https://groups.google.com/forum/#!forum/getting-started-with-spring-framework
Saturday, January 14, 2012
Spring Roo 1.1 Cookbook review by Shekhar Gulati
Many thanks to Shekhar for reviewing Spring Roo 1.1 Cookbook :)
You can visit Shekhar's blog and read the complete review here : http://whyjava.wordpress.com/2011/12/21/spring-roo-1-1-cookbook-review/
View and add dynamic finder methods
A dynamic finder method is a finder method for which you don't need to write a JPA query.
Download ch03_persistent_entities.roo script from the source code that accompanies Spring Roo 1.1 Cookbook: http://code.google.com/p/spring-roo-cookbook/downloads/list
The script sets up Hibernate as a persistence provider and creates a Flight entity, which
has FlightKey as its composite primary key class. Additionally, the script adds fields to the
Flight and FlightKey classes. If you are using a different database than MySQL or your
connection settings are different than what is specified in the script, then modify the script
accordingly.
To view dynamic finder methods, follow the given steps:
roo> focus --class ~.domain.Flight
2. Execute the finder list command to view the list of candidate dynamic finder
methods for the Flight entity, as shown here:
~.domain.Flight roo> finder list
.....
findFlightsByCreatedDateBetween(Date minCreatedDate, Date
maxCreatedDate)
findFlightsByCreatedDateGreaterThan(Date createdDate)
.....
To add dynamic finder methods, follow the given steps:
1. Add the findFlightsByDestinationLikeAndOriginLike dynamic finder
method to the Flight entity using the finder add command:
.. roo> finder add findFlightsByDestinationLikeAndOriginLike
Updated SRC_MAIN_JAVA\sample\roo\flightapp\domain\Flight.java
Created SRC_MAIN_JAVA\sample\roo\flightapp\domain\Flight_Roo_Finder.aj
The following code shows the auto-generated implementation of the
findFlightsByDestinationLikeAndOriginLike finder method in the Flight_Roo_Finder.aj file:
import javax.persistence.EntityManager;
import javax.persistence.TypedQuery;
...
public static TypedQuery
Flight.findFlightsByDestinationLikeAndOriginLike(String destination, String origin) {
if (destination == null || destination.length() == 0)
throw new IllegalArgumentException("The destination argument is required");
...
if (origin == null || origin.length() == 0)
throw new IllegalArgumentException("The origin argument is required");
...
EntityManager em = Flight.entityManager();
TypedQuery q = em.createQuery("SELECT Flight FROM Flight AS flight WHERE
LOWER(flight.destination) LIKE
LOWER(:destination) AND LOWER(flight.origin) LIKE
LOWER(:origin)", Flight.class);
q.setParameter("destination", destination);
q.setParameter("origin", origin);
return q;
}
Download ch03_persistent_entities.roo script from the source code that accompanies Spring Roo 1.1 Cookbook: http://code.google.com/p/spring-roo-cookbook/downloads/list
The script sets up Hibernate as a persistence provider and creates a Flight entity, which
has FlightKey as its composite primary key class. Additionally, the script adds fields to the
Flight and FlightKey classes. If you are using a different database than MySQL or your
connection settings are different than what is specified in the script, then modify the script
accordingly.
To view dynamic finder methods, follow the given steps:
1. Start Roo shell and set the focus of the subsequent commands on the Flight entity using the focus
command:roo> focus --class ~.domain.Flight
2. Execute the finder list command to view the list of candidate dynamic finder
methods for the Flight entity, as shown here:
~.domain.Flight roo> finder list
.....
findFlightsByCreatedDateBetween(Date minCreatedDate, Date
maxCreatedDate)
findFlightsByCreatedDateGreaterThan(Date createdDate)
.....
To add dynamic finder methods, follow the given steps:
1. Add the findFlightsByDestinationLikeAndOriginLike dynamic finder
method to the Flight entity using the finder add command:
.. roo> finder add findFlightsByDestinationLikeAndOriginLike
Updated SRC_MAIN_JAVA\sample\roo\flightapp\domain\Flight.java
Created SRC_MAIN_JAVA\sample\roo\flightapp\domain\Flight_Roo_Finder.aj
findFlightsByDestinationLikeAndOriginLike finder method in the Flight_Roo_Finder.aj file:
import javax.persistence.TypedQuery;
...
public static TypedQuery
Flight.findFlightsByDestinationLikeAndOriginLike(String destination, String origin) {
if (destination == null || destination.length() == 0)
throw new IllegalArgumentException("The destination argument is required");
...
if (origin == null || origin.length() == 0)
throw new IllegalArgumentException("The origin argument is required");
...
EntityManager em = Flight.entityManager();
TypedQuery
LOWER(flight.destination) LIKE
LOWER(:destination) AND LOWER(flight.origin) LIKE
LOWER(:origin)", Flight.class);
q.setParameter("destination", destination);
q.setParameter("origin", origin);
return q;
}
Monday, December 12, 2011
Adding JSON support to domain objects and controllers
This post shows how you can add JSON support to your applications using Spring Roo. The information in this post has been taken from Spring Roo 1.1 Cookbook.
Step 1: Download Roo scripts and sample code from the following location:http://code.google.com/p/spring-roo-cookbook/downloads/list#columnprefs
Step 2: Execute the ch04_web-app.roo script that creates the flight-app Roo project, sets up
Hibernate as the persistence provider, configures MySQL as the database for the application,
creates the Flight and FlightDescription JPA entities, and defines a many-to-one
relationship between the Flight and FlightDescription entities. If you are using a
different database than MySQL or your connection settings are different than what is specified
in the script, then modify the script accordingly.
Step 3: Execute the controller all command to create controllers and JSPX views corresponding
to JPA entities in the flight-app project, as shown here:
.. roo> controller all --package ~.web
Execute the perform eclipse command to update the project's classpath settings, as
shown here:
.. roo> perform eclipse
Now, import the flight-app project into your Eclipse IDE.
Step 4: To add the json support execute the json add command against the Flight JPA entity:
~.domain.Flight roo> json add --class ~.domain.Flight
Updated SRC_MAIN_JAVA\...\domain\Flight.java
Created SRC_MAIN_JAVA\...\domain\Flight_Roo_Json.aj
Created SRC_MAIN_JAVA\...\web\FlightController_Roo_Controller_Json.aj
Executing the json add command creates
a *_Roo_Json.aj AspectJ ITD, which defines methods for converting objects of the class to
JSON documents and vice versa, as shown here:
import flexjson.JSONDeserializer;
import flexjson.JSONSerializer;
privileged aspect Flight_Roo_Json {
public String Flight.toJson() {
return new JSONSerializer().exclude("*.class").serialize(this);
}
public static Flight Flight.fromJsonToFlight(String json) {
return new JSONDeserializer().use(null, Flight.class).deserialize(json);
}
public static String Flight.toJsonArray(
Collection collection) {
...
}
public static Collection
Flight.fromJsonArrayToFlights(String json) {
...
}
}
The following code shows the FlightController_Roo_Controller_Json.aj ITD, which
was generated:
import org.springframework.http.ResponseEntity;
import org.springframework.web.bind.annotation.ResponseBody;
privileged aspect FlightController_Roo_Controller_Json {
@RequestMapping(value = "/{flightId}", method = RequestMethod.GET,
headers = "Accept=application/json")
@ResponseBody
public Object FlightController.showJson(@PathVariable("flightId") Long flightId) {
Flight flight = Flight.findFlight(flightId);
if (flight == null) {
HttpHeaders headers= new HttpHeaders();
headers.add("Content-Type", "application/text");
return new ResponseEntity(headers, HttpStatus.NOT_FOUND);
}
return flight.toJson();
}
...
}
Monday, November 28, 2011
Spring Roo 1.1 Cookbook review by Cengiz Öner
I just came across review of Spring Roo 1.1 Cookbook by Cengiz Öner. Many thanks to Cengiz for writing the review :)
You can visit Cengiz's blog and read the complete review here : http://gwtsts.blogspot.com/2011/11/review-spring-roo-11-cookbook-by-ashish.html
You can visit Cengiz's blog and read the complete review here : http://gwtsts.blogspot.com/2011/11/review-spring-roo-11-cookbook-by-ashish.html
Monday, October 31, 2011
Spring Roo podcast
You can download the Spring Roo podcast from Banglore Software Radio website: http://www.bangaloresoftwareradio.info/
Tuesday, October 18, 2011
Spring Roo presentation
Last week I gave a presentation on Spring Roo in Silicon India conference held in Hyderabad. I tried my best to give a complete example that makes use of Spring Roo features to develop a Flight Booking application. Link to PDF: http://www.siliconindia.com/events/siliconindia_events/Java_Hyd_Conf/Ashish_Spring_Roo.pdf
Wednesday, October 5, 2011
Quick introduction to AspectJ ITD
In this post, I'll show a few examples of AspectJ ITDs that are generated by Spring Roo and the declarations contained in those ITDs. You'll find a more detailed discussion in Chapter 1 (which is available for download) of Spring Roo 1.1 Cookbook.


Example 1: FlightService_Roo_ToString.aj
package
sample.roo.flightapp.service;
privileged aspect FlightService_Roo_ToString {
public
String FlightService.toString() {
StringBuilder sb = new StringBuilder();
sb.append("Origin: ")
.append(getOrigin());
return sb.toString();
}
}
The following figure shows what the above declaration implies:

Example 2: FlightService_Roo_Serializable.aj
package
sample.roo.flightapp.service;
import
java.io.Serializable;
privileged
aspect FlightService_Roo_Serializable {
declare
parents: FlightService implements Serializable;
private
static final long FlightService.serialVersionUID
=
5059552858884348572L
}
The following figure shows what the above declaration implies:

Tuesday, October 4, 2011
Spring Roo 1.1 Cookbook promotion at Javaranch
This week I'll be responding to questions related to Spring Roo in the Spring forum of Javaranch (http://www.coderanch.com/forums/f-96/Spring). You can win a copy of the book by posting questions in the Spring forum.
Spring Roo - future of Java application development
Traditional Java enterprise application development required developers to write the boilerplate code. The Spring Framework simplified Java enterprise application development with DI and POJO-based approach to developing applications. No wonder, Spring Framework has become the most popular platform for developing applications.
Spring Framework simplifies developing enterprise applications using standard technologies, like JPA, Hibernate, JDBC, Flex, JavaMail, JMS, and so on. Still, you need to write some generic configuration and generic code which can be generated by a tool. Let's look at a few examples:
1. If you write a class, you normally override the toString method
2. If you write a JPA entity class, then you provide getter/setters methods for persistent fields, method to obtain reference to EntityManager, create persistence.xml, and so on.
3. When using Spring Web MVC, you need to configure handler mappings, create controller classes corresponding to JPA entities, create JSP views, and so on.
...
And the list goes on and on, depending upon the technology or framework that you are using. If all these generic configurations and code are generated and managed by a development tool, developers will be more productive. And, if the code generated follows best practices of development, then you don't need to even worry about incorporating best practices in your application architecture. This is where Spring Roo comes as the next generation productivity improvement tool.
Spring Roo generates generic configurations and code to help developers focus on writing the business logic. There are no runtime dependencies of application on Spring Roo, and you can easily modify the Roo-generated code by using Push-in refactoring. So, even though you are using a productivity improvement tool, you have full control over modifying the generated code, and you don't need to learn any new language or frameworks to do so. If you know Spring, you can easily get started with using Spring Roo effectively. Spring Roo truely defines the future of enterprise Java application development.
Spring Framework simplifies developing enterprise applications using standard technologies, like JPA, Hibernate, JDBC, Flex, JavaMail, JMS, and so on. Still, you need to write some generic configuration and generic code which can be generated by a tool. Let's look at a few examples:
1. If you write a class, you normally override the toString method
2. If you write a JPA entity class, then you provide getter/setters methods for persistent fields, method to obtain reference to EntityManager, create persistence.xml, and so on.
3. When using Spring Web MVC, you need to configure handler mappings, create controller classes corresponding to JPA entities, create JSP views, and so on.
...
And the list goes on and on, depending upon the technology or framework that you are using. If all these generic configurations and code are generated and managed by a development tool, developers will be more productive. And, if the code generated follows best practices of development, then you don't need to even worry about incorporating best practices in your application architecture. This is where Spring Roo comes as the next generation productivity improvement tool.
Spring Roo generates generic configurations and code to help developers focus on writing the business logic. There are no runtime dependencies of application on Spring Roo, and you can easily modify the Roo-generated code by using Push-in refactoring. So, even though you are using a productivity improvement tool, you have full control over modifying the generated code, and you don't need to learn any new language or frameworks to do so. If you know Spring, you can easily get started with using Spring Roo effectively. Spring Roo truely defines the future of enterprise Java application development.
Thursday, September 29, 2011
How to get the most out of Spring Roo 1.1 Cookbook
The recipes covered in Spring Roo 1.1 Cookbook are applicable to version 1.1.3, 1.1.4 and 1.1.5 version of Spring Roo. The Spring Roo 1.2 is currently in the milestone release, and it's final release will come sometime in December or early next year. Here, a few of my recommendations when going through recipes in Spring Roo 1.1 Cookbook:
1 - Use Spring Roo 1.1.5 when working with recipes described in Spring Roo 1.1 Cookbook.
2 - Don't do copy-paste of commands from eBook to Roo shell. Instead, type it yourself on the Roo shell (you don't need to type everything because Roo offers auto-completion feature)
3 - If you are evaluating Spring Roo for developing an application which makes use of a set of technologies or frameworks, then pay close attention to 'How it works...' section, which describes what all configuration and code is generated by Spring Roo.
4 - If you are using Spring Roo to learn a technology, it is important to focus on 'How it works...' section.
5 - Be prepared to write code or customize the Roo-generated code. A lot of recipes show what to customize and how to customize Roo-generated code.
2 recipes from Chapter 4 of Spring Roo 1.1 Cookbook
2 recipes from Chapter 4 of Spring Roo 1.1 Cookbook are now available at Packt website: http://www.packtpub.com/article/working-with-roo-generated-web-applications
Wednesday, September 28, 2011
What is covered in Spring Roo 1.1 Cookbook
As a follow up to the previous post, here I've detailed what information you'll find in Spring Roo 1.1 Cookbook and for what information you need to refer to other resources.
AspectJ ITDs - Information about AspectJ ITDs and how they are used by Spring Roo is covered in extensive detail. You'll recipes related to Push-in and Push-out refactoring also.
Spring framework and Maven - The Spring Roo Cookbook assumes that you have enough understanding of Spring and Maven. If not, then please refer to Spring reference documentation or any other tutorial or book.
Technology or framework information - Spring Roo Cookbook attempts to give a crash course in JPA, GWT, Flex, Spring Web Flow, Spring Web MVC, Selenium, Solr, and other technologies for which base add-ons are provided by Roo. If you have never used these frameworks, Spring Roo Cookbook woul;d still be an easy read for you. If you are looking for details on these technologies or frameworks, then it is recommended that you refer to some other resources.
OSGi - You'll find some introductory information about OSGi, as this forms the heart of Spring Roo add-ons
Roo-generated code information - This is at the heart of Spring Roo Cookbook. It attempts to cover all the Roo-generated code and configuration information. You'll find information about maven plugins that are configured by Roo in pom.xml file, AspectJ ITDs, Java source code, and so on.
Add-on development - Chapter 7 shows the code generated by Roo for simple and advanced add-ons. It should give you a solid starting point to create your own add-ons. This should give enough information about internal workings of Spring Roo.
AspectJ ITDs - Information about AspectJ ITDs and how they are used by Spring Roo is covered in extensive detail. You'll recipes related to Push-in and Push-out refactoring also.
Spring framework and Maven - The Spring Roo Cookbook assumes that you have enough understanding of Spring and Maven. If not, then please refer to Spring reference documentation or any other tutorial or book.
Technology or framework information - Spring Roo Cookbook attempts to give a crash course in JPA, GWT, Flex, Spring Web Flow, Spring Web MVC, Selenium, Solr, and other technologies for which base add-ons are provided by Roo. If you have never used these frameworks, Spring Roo Cookbook woul;d still be an easy read for you. If you are looking for details on these technologies or frameworks, then it is recommended that you refer to some other resources.
OSGi - You'll find some introductory information about OSGi, as this forms the heart of Spring Roo add-ons
Roo-generated code information - This is at the heart of Spring Roo Cookbook. It attempts to cover all the Roo-generated code and configuration information. You'll find information about maven plugins that are configured by Roo in pom.xml file, AspectJ ITDs, Java source code, and so on.
Add-on development - Chapter 7 shows the code generated by Roo for simple and advanced add-ons. It should give you a solid starting point to create your own add-ons. This should give enough information about internal workings of Spring Roo.
How to get the most out of Spring Roo development tool
Let me say this upfront - Spring Roo is not a replacement for a developer's technical skills. It'll only help you to be more productive but don't expect the tool to do everything for you.
To get the most out of Spring Roo, you need understanding of the following areas:
The first 3 points address the must-haves for using Spring Roo or you won't be able to understand what's going on when you execute commands.
It is important to know how code generation works in Spring Roo. For instance, add-ons are responsible for managing AspectJ ITDs so you should not modify them.
To get the most out of Spring Roo, you need understanding of the following areas:
1. AspectJ ITDs
2. Maven
3. Spring framework
The first 3 points address the must-haves for using Spring Roo or you won't be able to understand what's going on when you execute commands.
4. Good understanding of the framework or technology for which you are using Spring Roo to generate code
This is important if you want to modify the code generated by Spring Roo.
For instance, if you don't know Spring Web MVC, then it won't be easy
for you to figure out what you need to change to meet your application's
requirements.
5. Some understanding of OSGi
If you have some understanding of OSGi, then you can easily understand what add-ons are and why Spring Roo follows add-on based architecture. This could also be helpful if you want to get started with developing your custom add-ons.
6. A solid understanding of the code generated by Spring Roo
The code generated by Spring Roo follows best practices and gives a solid foundation for developing your application. This understanding is important if you want to make changes to Roo-generated code to meet specific requirements of your applications.
7. A good understanding of add-ons
Not all features that you need are part of base add-ons provided by Spring Roo. So some understanding of how to install and remove add-ons is helpful. For instance, if there is a Portlet add-on, you need to know how to install it in your Spring Roo installation to create portlets.
8. A good understanding of how Spring Roo works when you execute commands from Roo shell
It is important to know how code generation works in Spring Roo. For instance, add-ons are responsible for managing AspectJ ITDs so you should not modify them.
Tuesday, September 27, 2011
Scaffolding a Spring Web MVC application
We saw in earlier two posts that using project command you can create a Java project, and by using persistence setup command you can setup a persistence provider (Hibernate, OpenJPA, and so on).
It's important to note the following when using Spring Roo:
- You don't need to remember commands because Roo is a very user-friendly development tool. You can look at all the Roo commands and their brief description using help command.
- Also, Roo offers auto-completion features - which means you partially type a command or an argument name, and Roo auto-completes it for you.
You can scaffold a Spring Web MVC application from JPA entities using controller all command.
Step 1: Download ch04_web-app.roo script from the Google Code project for Spring Roo 1.1 Cookbook (http://code.google.com/p/spring-roo-cookbook/downloads/list). Execute ch04_web-app.roo script using script command of Spring Roo. A Roo script contains a sequence of commands which are executed when you execute script command, as shown here:
roo> script --file ch04_web-app.roo
Executing ch04_web-app.roo script creates flight-app Roo project, sets up Hibernate as persistence provider, configures MySQL as the database for the application, creates Flight and FlightDescription JPA entities and defines many-to-one relationship between Flight and FlightDescription entities. If you are using a different database than MySQL or your connection settings are different than what is specified in the script, then modify the script accordingly.
Step 2: Execute controller all command:
.. roo> controller all --package ~.web
The controller all command creates JSPX views, controllers, copies custom tags, default themes, and so on. The package argument specifies the location where the Spring Web MVC controllers are created by Roo.
Step 3. You can now convert the project into an Eclipse IDE project using perform eclipse command. The perform eclipse command generates .project and .classpath files required by Eclipse IDE.
Step 4. You can also run the flight-app application in embedded Tomcat container by exiting the Roo shell (by executing quit command) and executing mvn tomcat:run goal from the command prompt. Now, you access the web application by going to the following URL: http://localhost:8080/flight-app
The following figure shows how the scaffolded web application looks like:

By default, the scaffolded web application allows you to perform CRUD operations on JPA entities, and to search entities based on the dynamic finder methods that you added to them.
It's important to note the following when using Spring Roo:
- You don't need to remember commands because Roo is a very user-friendly development tool. You can look at all the Roo commands and their brief description using help command.
- Also, Roo offers auto-completion features - which means you partially type a command or an argument name, and Roo auto-completes it for you.
You can scaffold a Spring Web MVC application from JPA entities using controller all command.
Step 1: Download ch04_web-app.roo script from the Google Code project for Spring Roo 1.1 Cookbook (http://code.google.com/p/spring-roo-cookbook/downloads/list). Execute ch04_web-app.roo script using script command of Spring Roo. A Roo script contains a sequence of commands which are executed when you execute script command, as shown here:
roo> script --file ch04_web-app.roo
Executing ch04_web-app.roo script creates flight-app Roo project, sets up Hibernate as persistence provider, configures MySQL as the database for the application, creates Flight and FlightDescription JPA entities and defines many-to-one relationship between Flight and FlightDescription entities. If you are using a different database than MySQL or your connection settings are different than what is specified in the script, then modify the script accordingly.
Step 2: Execute controller all command:
.. roo> controller all --package ~.web
The controller all command creates JSPX views, controllers, copies custom tags, default themes, and so on. The package argument specifies the location where the Spring Web MVC controllers are created by Roo.
Step 3. You can now convert the project into an Eclipse IDE project using perform eclipse command. The perform eclipse command generates .project and .classpath files required by Eclipse IDE.
Step 4. You can also run the flight-app application in embedded Tomcat container by exiting the Roo shell (by executing quit command) and executing mvn tomcat:run goal from the command prompt. Now, you access the web application by going to the following URL: http://localhost:8080/flight-app
The following figure shows how the scaffolded web application looks like:
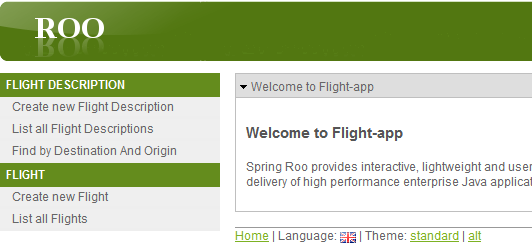
By default, the scaffolded web application allows you to perform CRUD operations on JPA entities, and to search entities based on the dynamic finder methods that you added to them.
Spring Roo 1.1 Cookbook published
I just heard from Packt that Spring Roo 1.1 Cookbook is now available.
Spring Roo 1.1 Cookbook provides a comprehensive coverage of Spring Roo
development tool features.
For more details, please refer the following links:
1. List of recipes covered in Spring Roo 1.1 Cookbook: https://groups.google.com/forum/#!topic/spring-roo-cookbook/mnM_GJMTto8
2. Book page at Packt: https://www.packtpub.com/spring-roo-1-1-cookbook/book You can download sample Chapter 1 from this page.
3. Amazon link: http://www.amazon.com/gp/product/1849514585/
4. Book review: http://www.owal.co.uk/a/springroocookbook
5. Book source code: http://code.google.com/p/spring-roo-cookbook/downloads/list
For more details, please refer the following links:
1. List of recipes covered in Spring Roo 1.1 Cookbook: https://groups.google.com/forum/#!topic/spring-roo-cookbook/mnM_GJMTto8
2. Book page at Packt: https://www.packtpub.com/spring-roo-1-1-cookbook/book You can download sample Chapter 1 from this page.
3. Amazon link: http://www.amazon.com/gp/product/1849514585/
4. Book review: http://www.owal.co.uk/a/springroocookbook
5. Book source code: http://code.google.com/p/spring-roo-cookbook/downloads/list
Monday, September 26, 2011
Creating JPA entities using Spring Roo
In the previous post we saw how you can create a Java project using project command of Roo. In this post, you'll see that how you can create JPA entities using Roo.
Before we go about creating JPA entities, if you take a quick look at the pom.xml file of flight-app project, you'll see that it contains standard dependencies that you'll typically have in your Spring-based Java projects. The extra dependencies that you see are related to AspectJ and Spring Roo's annotation. You'll also notice that pom.xml configures Eclipse Maven plugin and Tomcat Maven Plugin.
Follow these steps to create a Flight JPA entity:
1. Setup a Hibernate as the persistence provider. Open command prompt and execute persistence setup command, as shown here:
... roo> persistence setup --provider HIBERNATE --database MYSQL
--databaseName myFlightAppDB
provider argument identifier a JPA provider (a couple of JPA providers are supported by Spring Roo)
database argument identifies the database that you are going to use for your application (a couple of databases are supported by Spring Roo)
databaseName argument identifies the name of the database
Executing persistence setup command creates a database.properties file which contains database configuration information (username, password, database name, database driver class). It also creates a persistence.xml file required by the JPA provider.
2. Create a persistence entity using entity command, as shown here:
..roo> entity --class ~.domain.Flight --table FLIGHT_TBL
The entity command shown above creates a Flight.java class (representing a JPA entity) in com.sample.flightapp.domain package. The table argument identifies the table to which the Flight entity maps. You'll see couple of more files created with .aj extension....these AspectJ ITD files, which you should never modify.
The following code shows the Flight.java class:
@RooJavaBean
@RooToString
@RooEntity(...)
public class Flight {...}
As you can see, Flight.java is annotated with couple of @Roo* annotations. These annotations trigger code generation in Spring Roo. The identifier definition, getter/setters for properties defined in Flight.java class, the persistence related methods (create, merge, update, and so on), and the toString methods are all inside the AspectJ ITD files generated by Roo.
The following things to note:
- AspectJ ITD files are like any other Java file, with a slightly different syntax. You don't need to learn a new language to understand AspecJ ITDs.
- The method, constructor, and so on, definitions in AspectJ ITD files are compiled into the corresponding Java source file. In our case, declarations contained in Flight_Roo_Entity.aj file are compiled into Flight class. This means resulting bytecode is not dependent on Roo at all.
- AspectJ ITD files are managed by Spring Roo when you make modifications to Java source file. So, you should not change them.
- If you want to modify a declaration in AspectJ ITD file, you can simply use Push-in Refactoring (using your IDE) to push the declaration (which could be method, attribute or constructor) into the corresponding Java source file. After doing push-in refactoring, you can modify the code manually in Java source file.
In the next post we'll go a step further and scaffold a Spring Web MVC application.
Before we go about creating JPA entities, if you take a quick look at the pom.xml file of flight-app project, you'll see that it contains standard dependencies that you'll typically have in your Spring-based Java projects. The extra dependencies that you see are related to AspectJ and Spring Roo's annotation. You'll also notice that pom.xml configures Eclipse Maven plugin and Tomcat Maven Plugin.
Follow these steps to create a Flight JPA entity:
1. Setup a Hibernate as the persistence provider. Open command prompt and execute persistence setup command, as shown here:
... roo> persistence setup --provider HIBERNATE --database MYSQL
--databaseName myFlightAppDB
provider argument identifier a JPA provider (a couple of JPA providers are supported by Spring Roo)
database argument identifies the database that you are going to use for your application (a couple of databases are supported by Spring Roo)
databaseName argument identifies the name of the database
Executing persistence setup command creates a database.properties file which contains database configuration information (username, password, database name, database driver class). It also creates a persistence.xml file required by the JPA provider.
2. Create a persistence entity using entity command, as shown here:
..roo> entity --class ~.domain.Flight --table FLIGHT_TBL
The entity command shown above creates a Flight.java class (representing a JPA entity) in com.sample.flightapp.domain package. The table argument identifies the table to which the Flight entity maps. You'll see couple of more files created with .aj extension....these AspectJ ITD files, which you should never modify.
The following code shows the Flight.java class:
@RooJavaBean
@RooToString
@RooEntity(...)
public class Flight {...}
As you can see, Flight.java is annotated with couple of @Roo* annotations. These annotations trigger code generation in Spring Roo. The identifier definition, getter/setters for properties defined in Flight.java class, the persistence related methods (create, merge, update, and so on), and the toString methods are all inside the AspectJ ITD files generated by Roo.
The following things to note:
- AspectJ ITD files are like any other Java file, with a slightly different syntax. You don't need to learn a new language to understand AspecJ ITDs.
- The method, constructor, and so on, definitions in AspectJ ITD files are compiled into the corresponding Java source file. In our case, declarations contained in Flight_Roo_Entity.aj file are compiled into Flight class. This means resulting bytecode is not dependent on Roo at all.
- AspectJ ITD files are managed by Spring Roo when you make modifications to Java source file. So, you should not change them.
- If you want to modify a declaration in AspectJ ITD file, you can simply use Push-in Refactoring (using your IDE) to push the declaration (which could be method, attribute or constructor) into the corresponding Java source file. After doing push-in refactoring, you can modify the code manually in Java source file.
In the next post we'll go a step further and scaffold a Spring Web MVC application.
Sunday, September 25, 2011
Creating your first Java project using Spring Roo
Spring Roo is a productivity improvement tool....and you got to use it to believe this. In this post I'll show how to quickly get started with Spring Roo and create a Roo project. I will also talk about some of the artifacts created by Roo.
Note - Some of the information covered in this post are covered in Chapter 1 of Spring Roo 1.1 Cookbook. Once the book is released, Chapter 1 will become freely available. (Update - Sample Chapter 1 of book is now available here: https://www.packtpub.com/spring-roo-1-1-cookbook/book)
Pre-requisite
Install Java SE 6 or later and set JAVA_HOME variable
Install Maven 3.x or later
1. Setting up Roo
Setting up Roo is simple, download the ZIP file from SpringSource website (http://www.springsource.org/roo/start) and unzip into a folder. Now, add path to bin directory of Roo to your PATH variable.
2. Verify installation
Create a directory named myfirst-app. Open command prompt and go to myfirst-app directory and enter roo on the command line. You'll see the following output if your installation was correct:
____ ____ ____
/ __ \/ __ \/ __ \
/ /_/ / / / / / / /
/ _, _/ /_/ / /_/ /
/_/ |_|\____/\____/ x.y.z.RELEASE
roo>
The command prompt now becomes roo> indicating that you are now inside the Roo shell. The output shows the Spring Roo release that you are using. All the commands that you enter now will be processed by Spring Roo. You can think of a Roo shell as nothing but a standalone Java application that processes commands.
3. Creating a project
The first step is to create a Roo project. Though this is called a Roo project, it's just a simple mavenized project. To create a Roo project enter project command of Roo, as shown here:
roo>project --topLevelPackage sample.roo.flightapp --java 6 --projectName flight-app
Created C:\roo-cookbook\ch01-recipe\pom.xml
.....
Created SRC_MAIN_RESOURCES\META-INF\spring\applicationContext.xml
Created SRC_MAIN_RESOURCES\log4j.properties
sample.roo.flightapp roo>
As you can see from the above output, nothing specific to Spring Roo is created. It is like any maven project for creating a Spring-based application.
topLevelPackage specifies the root package of your project.
projectName specifies the name of the project. This becomes the <artifact-id> and <name> element values in pom.xml file.
The applicationContext.xml file is shown here:
<beans ..>
<context:property-placeholder
location="classpath*:META-INF/spring/*.properties"/>
<context:spring-configured/>
<context:component-scan base-package="sample.roo.flightapp"
<context:exclude-filter
expression=".*_Roo_.*" type="regex"/
<context:exclude-filter expression=
"org.springframework.stereotype.Controller"
type="annotation"/
</context:component-scan
</beans
As the above listing shows, it contain <component-scan> element to auto-register Spring components. It excludes classes that follow the naming convention *_Roo_* and which are annotated with @Controller annotation.
As you can see, project command simply creates a maven project with some Roo-specific configuration. These Roo-specific configurations are quite limited and you can remove them, when you decide to do so. For instance, you can modify the <component-scan> shown above to exclude Roo-specific exclusion rule, and you can use this project as any other Spring project.
In the next post, we'll look at how create a JPA entity and import the flight-app project into Eclipse or STS or IDEA IDE.
Subscribe to:
Posts (Atom)